
Connect NAVER WORKS
Connect NAVER WORKS and the AI can read and organize your mail, calendar, Drive, boards, and tasks. With your approval, it can also send mail, create events, write posts, and add tasks for you. Add a bot to send reports and alerts as messages, too.
Step 1. Create the app (admin)
Sign in to NAVER WORKS Developer Console (dev.worksmobile.com) with a NAVER WORKS admin account, and add a new app under API 2.0.
In Redirect URL, register the address shown in Neuro's connection window exactly as it appears (use the window's Copy Redirect URL button). If even one character is different, member sign-in will fail.
Add the following to OAuth Scopes and save:
openid, email, profile, mail, calendar, file.read, board, task, bot.message, bot.read. If you won't use a bot, you can leave out bot.message and bot.read.Copy the Client ID and Client Secret from the app details and keep them handy.
Step 2. Connect to Neuro (admin)
In your Neuro workspace, open the Data sources → NAVER WORKS card.
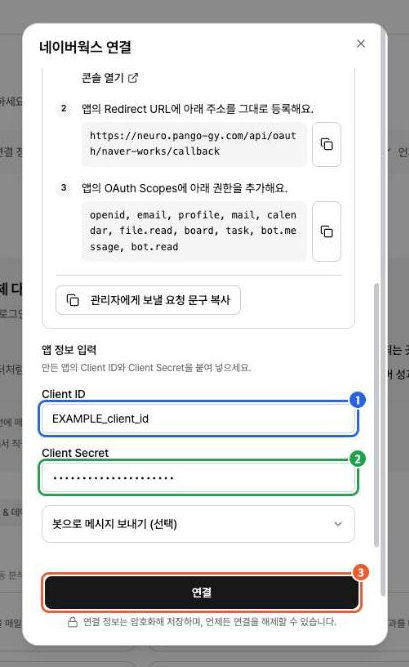
Enter the Client ID and Client Secret, then click Connect. If you also want to use a bot, first complete “Optional: Send messages as a bot” below, then fill in the Send messages as a bot section as well.
Step 3. Connect your account (each member)
On the Data sources page, click Connect my NAVER WORKS account in the NAVER WORKS row.
In the window that opens, sign in to NAVER WORKS and agree to the permissions. That's it. When the row shows “My account: (your email),” you're connected.
Your sign-in stays active for about 90 days. If you haven't used it for a while or an admin changes the permissions, you'll see Reconnect.
Try asking the AI
“Summarize the emails our ad agency sent yesterday.”
“Organize my schedule for this week, and book a campaign review meeting for Thursday at 3 p.m.”
“Find the ‘October media rates’ file in Drive and summarize it.” The AI can read the contents of text and CSV files. For Excel and PDF files, it can see only the file name and details.
“Show me the 3 latest posts on the announcements board.” / “Post this month's performance summary to the marketing board.”
“Tell me which of my tasks are overdue, and add ‘Review the report’ as a task.”
Optional: Send messages as a bot
On the app page from Step 1, issue a Service Account and download the Private Key file. Each app can have only one, and admins are notified when it's issued.
In NAVER WORKS Developer Console, register a bot from the Bot menu. To also send to group chat rooms, turn on allow joining 1:N chat rooms. After saving, copy the Bot ID that appears.
In the admin console, add the bot to your company domain. Until you do, the bot's status stays “Preparing” and it can't send messages.
In Neuro's connection window, expand Send messages as a bot (optional), enter the Service Account, Private Key (use Load key file), and Bot ID, then connect. Neuro checks that the bot works with the details you entered before saving.
Choose recipients by member email or by chat room channel ID. For a chat room, invite the bot first, then copy the “Channel ID” from the room menu and share it (the bot can't find rooms by name).
Permissions and data handling
Member sign-in works only with that person's own permissions. Drive is read-only. Mail, calendar, boards, and tasks can be read, and written to only with approval.
The bot is used only to send messages. It never reads mail or calendars.
The Client Secret, Private Key, and member sign-in details are stored encrypted and never shown on screen again.
Just like data from other platforms, any mail or post content the AI reads stays in that AI chat's history. For sensitive mail, deleting the chat removes it as well.
For details on what we collect and how long we keep it, see our Privacy Policy.
Disconnecting
Members — Click Disconnect in the row on the Data sources page to delete your account connection details.
Admins — Disconnecting NAVER WORKS disconnects every member's account and deletes the stored keys. The app and bot belong to your company, so Neuro doesn't delete them. If you no longer need them, delete them in NAVER WORKS Developer Console.
Troubleshooting
The Connect my NAVER WORKS account window shows an error
Ask your admin to check the app settings (Redirect URL and permissions). The app's Redirect URL must exactly match the address in the connection window, and OAuth Scopes must include all the permissions listed above. After permissions are added, members need to reconnect for the change to take effect.
The AI tells me to connect my account
The person using that chat hasn't connected their account yet, or their connection has expired. Connect or reconnect from the Data sources page.
It says bot authentication failed
Check that the Client ID, Client Secret, Service Account, and Private Key all come from the same app, and that Scopes include bot.message and bot.read.
Bot messages fail to send
Check that the bot has been added to your domain in the admin console, that the recipient is a member of the same company, and, for a chat room, that the bot has been invited to it.