
Connect AppsFlyer
Connect AppsFlyer to match your mobile app's install, event, LTV, cohort, and retention data with your ad spend and analyze it automatically. You'll create an AppsFlyer V2 API token and connect it to your workspace.
What you need
AppsFlyer Admin access — Only Admins can view and create V2 API tokens. If you don't have this access, ask your account admin to create one for you.
At least one app registered in AppsFlyer
Step 1 — Create a V2 API token
In the AppsFlyer dashboard, open the account menu in the top-right corner and go to Security Center.
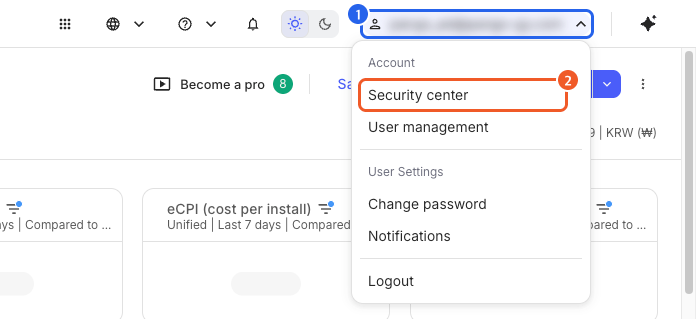
In the AppsFlyer tokens section, open Manage your AppsFlyer tokens.

Click New token to create a new token (API V2), or copy an existing one.
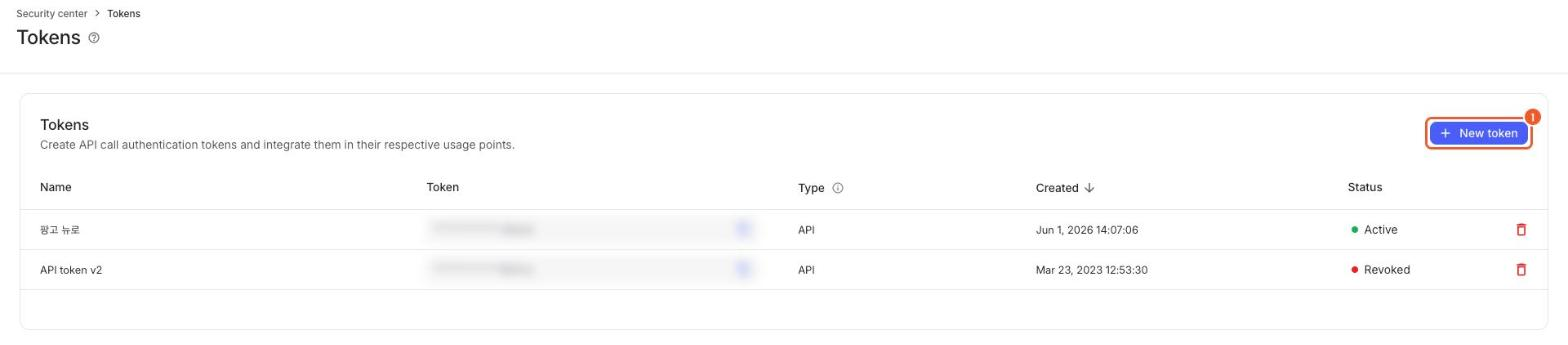
The token is a very long string. You can't view it again once you close the screen, so copy it right away and keep it somewhere safe (such as a password manager).
Official guide: Managing AppsFlyer tokens
Step 2 — Add Neuro's IP to the API allowlist (required if you use the allowlist)
Neuro connects from a single address, so that's the only one you need to add to the allowlist.
IP to add: 3.39.125.53
How to add it
In the top-right corner of AppsFlyer, go to account menu (email dropdown) → Security Center.
In the API allowlist section, click Manage allowlist.

Click + Add and enter the IP above.
Make sure the Active toggle is on, then click Save list. (Clicking Save list alone doesn't change the active status, so check the toggle separately.)
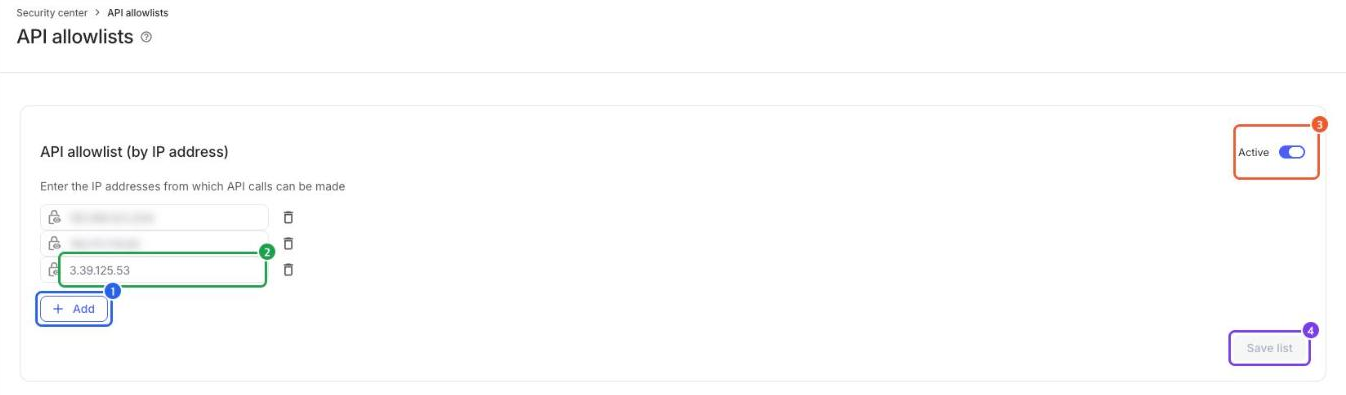
If your account doesn't use the allowlist (it's inactive), you can skip this step and still connect. However, the token alone can then be used from any IP, so for security we recommend keeping the allowlist Active and adding the IP above.
Official guide: Set up your API allowlist
Step 3 — Connect in Neuro
In your workspace, go to Data sources → AppsFlyer and click the card.
Enter the V2 API token you created in Step 1 and click Load apps.
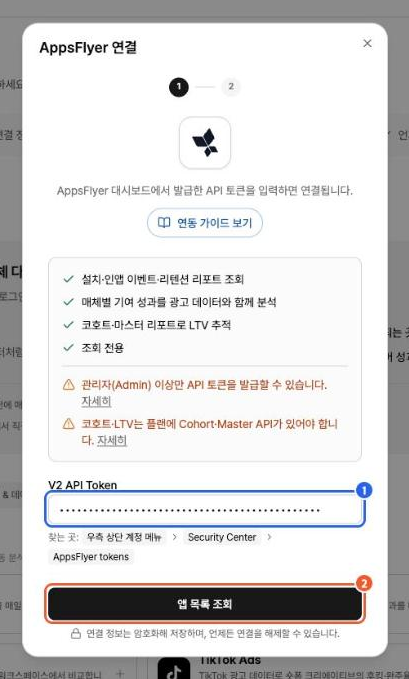
If the token is valid, the apps in your account appear. You can select several apps at once to analyze (for example, the iOS and Android versions of the same app).
Click Connect N apps and you're done. The token is encrypted and stored once in your workspace, and it's shared by all the apps you selected.
Example prompts
Once connected, you can ask for analysis in plain language in chat. The AI already knows which apps are connected, so you don't need to give it app IDs.
“Show this month's app installs by media source.”
“Compare 7-day retention between iOS and Android.”
“Which media source or campaign had the highest LTV this quarter?”
“Show the ROAS trend for our retargeting campaigns.”
Troubleshooting
Cohort, LTV, or retention reports don't load
This happens when your account plan doesn't include the Cohort API / Master API add-on. Rephrasing your request won't fix it. Check the feature list in AppsFlyer's “My Plan”, and if needed, ask your AppsFlyer contact to activate the add-on. (Install and event totals work without the add-on.)
It says the token is invalid
Tokens created a long time ago can't be used. Create a new token in Security Center and enter it again.
It says the token doesn't have permission to load the app list
This usually happens because Neuro's IP is missing from your account's API allowlist. Follow Step 2 to add the IP above under Security Center → API allowlist, and make sure you've turned on the Active toggle and clicked Save list. If the error continues, check that the user who created the token has Admin access.
I want to replace the token
Create a new token in AppsFlyer, disconnect your existing AppsFlyer connections, and then reconnect with the new token. Entering the same token again won't save a duplicate.